


Netflix has recently started blocking almost all VPN connections in order stop customers from watching shows that aren’t available in their home countries (UPDATE: ExpressVPN is still working with Netflix and offers a 30 day money back guarantee, full details here). VPNs were a popular means for people living outside the US and UK to gain access to the larger archive of shows available to Americans and Brits. But in order for Netflix to honor geographic content licensing restrictions, the workaround has come to an end.
Thankfully, there’s an alternative. Meet Smart DNS, a type of proxy service that obscures the IP address–and thereby the location–of the user, making it possible to bypass geographic restrictions. Netflix brought the hammer down hard on VPNs, but it seems to still be turning a blind eye to Smart DNS. Smart DNS is also known as a DNS proxy.
We have confirmed that Smart DNS works during our testing of IronSocket, a paid VPN provider that also includes a Smart DNS service specifically for accessing streaming video websites in its subscription plan. A range of free and paid Smart DNS services are available on the web and we haven’t had time to test the whole lot, but I was personally able to watch Attack on Titan and Parks and Recreation, two shows not available from my home in Bogota, Colombia. UPDATE: we’ve had a few comments about inconsistent connections with IronSocket so are now recommending ExpressVPN as the safest option.
Some users have reported Netflix’s Android app does not work with Smart DNS services, as it forces the user onto Google DNS instead. UnoTelly and Unblock-Us have both reported Netflix has blocked them, so Netflix seems to be in the process of cracking down. Smart DNS still seems to be working on other platforms, however, and we’ll update this post if that changes.
Keep in mind that a Smart DNS service is not a full replacement for a VPN. It does not encrypt internet traffic and therefore lacks many of the security features of a VPN. But because it lacks encryption, Smart DNS is usually faster than a VPN, which means higher quality streams and less buffering.
Setting up Smart DNS
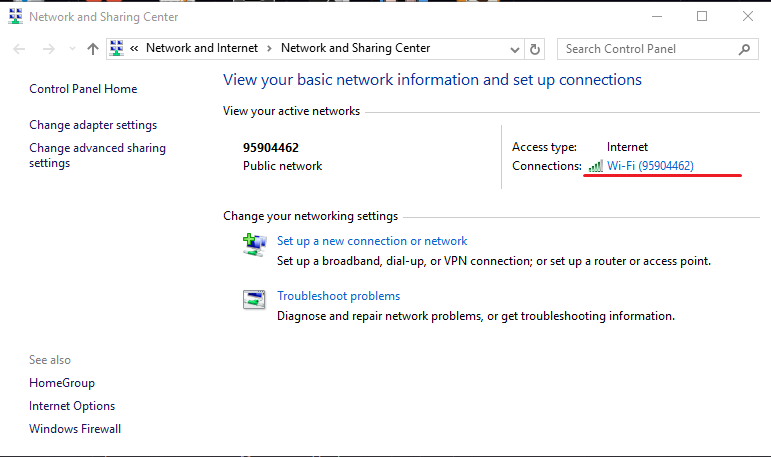
How to set up Smart DNS can vary depending on which provider you choose. First, you’ll need to authorize your computer’s IP address so the provider can verify that you’re a customer. This is done on the provider’s website. Here’s a quick tutorial using IronSocket’s service with Windows 10 after authorizing your IP.First, right click the wifi or ethernet icon in your system tray and click “Open Network and Sharing Center.”

Click the link that says “Wifi” or “Ethernet” next to Connections.
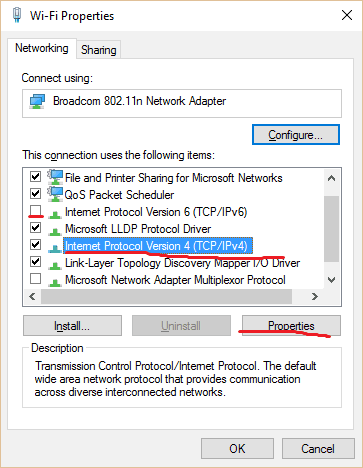
Click Properties.

Uncheck Internet Protocol Version 6 (TCP/IPv6). Click on Internet Protocol Version 4 (TCP/IPv4) so that it’s highlighted, then click Properties.
On the lower half of the next window, check “Use the following DNS server addresses:”. Input the preferred and alternate DNS servers (servers should be in the United States), which should be given to you by your Smart DNS provider.
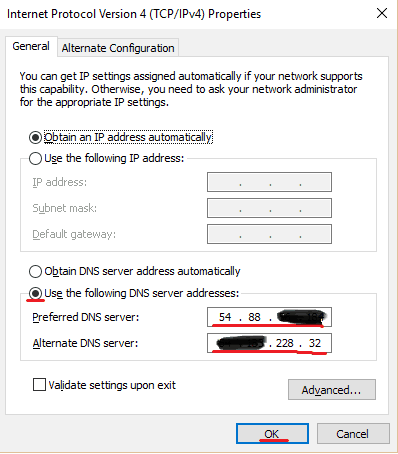
Press OK and restart your computer. Now you should be able to use Netflix as if you were in the US.


